One of the first questions which faces a neophyte to the aquarium hobby, especially those who wish to tackle a "reef system," regards the show tank. Where should it go? How big? Is long better than deep? What about width? Glass or acrylic? Actually, there are a lot of other questions that should also be asked, but are usually neglected until too late, questions such as: how will water get into the tank and back out again? How will I service the tank (stocking, cleaning, feeding, water changes)? Will the floor support the weight? etc., etc. This section presents some of the analysis that I went through in designing and building the show tank that is the center piece of my "scratch-built" reef system.
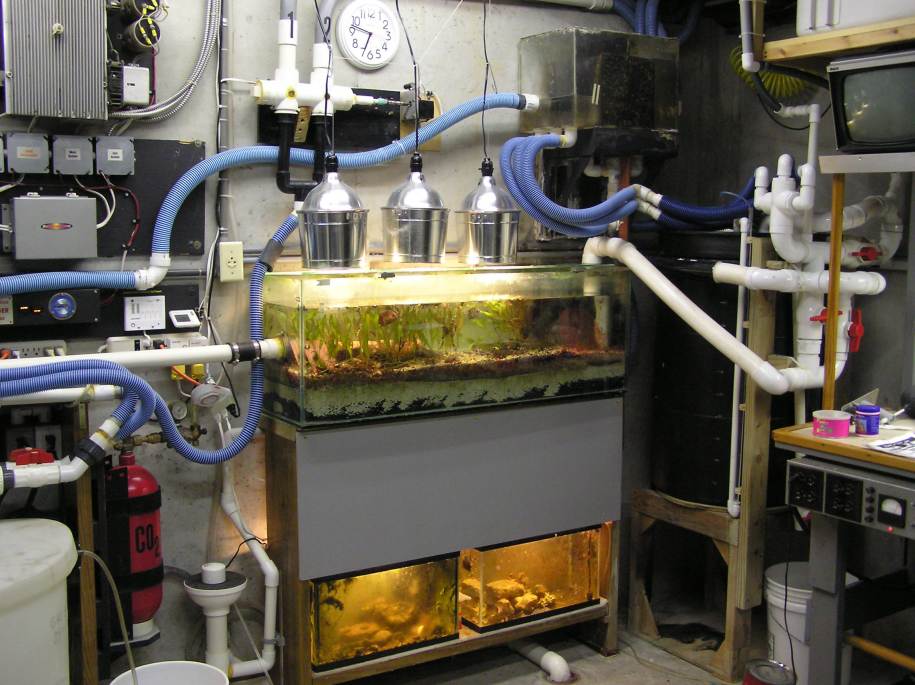
When I designed our house, I placed a two-foot thick wall between the family room and the breakfast room. One end of this wall contains a coat closet, but fully two thirds of this wall was slated for my future reef tank. Centered under this wall is a supporting poured concrete wall upon which most of my aquarium support equipment is mounted. The aquarium sits on a table with multiple 2 x 10 pressure-treated lumber supports between the table surface and the concrete wall below. The surface of the table is perfectly level because I made a half inch dam all around it and poured a mixture of fiberglass resin and fillers to form a self leveling surface applique. Over this, I added an eighth inch sheet of "sintra" which is an expanded PVC sheet used by sign makers. It is deformable to allow the slightest imperfection in the surface table to be cushioned. On top of this sits my show tank.
Now I realize that not everyone will have the luxury to design an aquarium into their house before the house is built, but you must consider load bearing and methods for leveling the tank where ever you decide to put it. Designing your system from the beginning rather than simply letting it evolve will save you heartache later.
In my case, I designed the show tank to be serviced from the spillway side, and from above. Though of little use, I have access to parts of the underside of the tank as well.
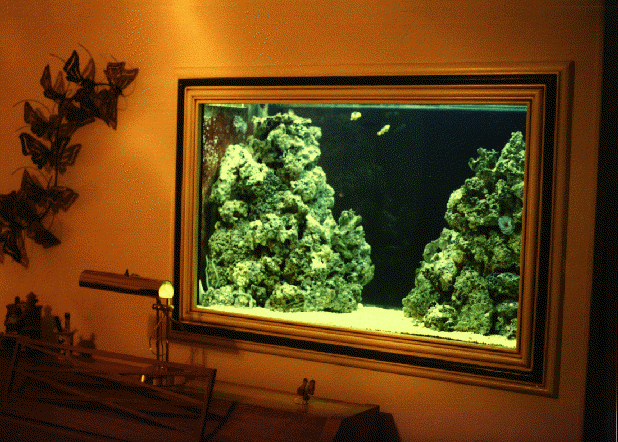
When I began this project, I had to consider the desired dimensions of the show tank. It is designed to be viewed as a living picture from both the family room and the breakfast room, so any coral heads had to be free standing and viewable from both sides. I also did not want ugly power heads and tubes to be visible all over the place. These considerations led me to design the tank with a head space above the water level which could accommodate pipes above and below the tank top. This tank was designed with a top to significantly suppress salt creep and water splatter as well as something that is usually neglected, noise. Sloshing water and bubbles make noise which could be annoying when other activities are taking place in the family room.
I had allocated approximately four and one half horizontal feet into which the aquarium could be placed. I decided to make the show tank exactly four feet long (outside dimension). This left six inches to run feed and drain pipes as well as the external spillway.
Since the wall would accommodate a two-foot wide tank, I chose the outside width dimension to be exactly 24 inches so that there would be no indentation between the viewing faces of the show tank and the wall surfaces.
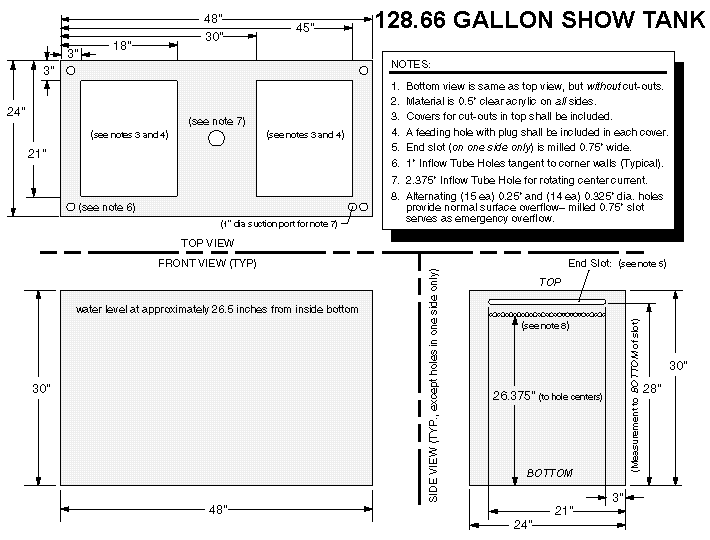
Now we have a two by four foot print, but how tall to make the aquarium? Since I did not plan to show any of the tank above the water line, this decision could be somewhat arbitrary. If it were too tall however, a strength of materials problem would be encountered, so I set the height at 30 inches with a maximum water height of 26.5 inches from the inside bottom. All of the dimensions for the tank are shown in the attached engineering drawing. The edges of the show tank were masked by a picture frame along the sides and the bottom. The height to width ratio of the viewable area was determined by the golden ratio of 61.8 percent height to width which yields the most aesthetically pleasing framed area to the human eye (why this occurs, is beyond the scope of this discussion).
Next the inevitable question that confronts the designer: glass or acrylic? Many sources denigrate acrylic in favor of glass, however in practice acrylic is the only choice that makes sense for a scratch-built system (and possibly any system). Here is why.
Acrylic or Plexiglas¨ (a trade mark of Atohaas North America, Inc.) is only 48 percent the weight of glass. This made my 126 gallon show tank which contains 3,211 cubic inches of acrylic weigh 130 lbs rather than an even more backbreaking 271 lbs were it to have been made out of glass. Remember, you will need to transport your show tank to its final resting place, and you will need to lift and position it. This is also another 141 lbs that your floor would have to support were you to recreate my system. Add to this 126 gallons of water (some of which is replaced by heavier rock and sand) and you will find that you must support 1,234 lbs! That's like having a small automobile standing on end in your living room. Would you want to add over 11.5 percent more weight by having used glass?
My show tank is taller than most and I wanted a good safety margin in terms of strength. A glass aquarium with a 0.25 inch plate glass side will withstand up to 1.0 ft-lb of energy before it breaks in an F50 standard test. Cell cast acrylic of the same thickness will require over 18 ft-lbs to break under the same conditions. That's eighteen times the energy required to break it- and were it to break, its failure mode is to crack whereas glass would literally explode under the hydrostatic pressure of the water.
Acrylic is also more flexible and can survive accidental blows where glass would yield. This can also mean that acrylic will bow more than glass of the same thickness, but this is overcome by using acrylic of sufficient thickness. The thicker the acrylic, the better from not only a strength standpoint, but also for its heat insulating properties. It will maintain the temperature of the show tank in the presence of room temperature fluctuations better than glass.
As thicker glass is used to attain comparable strength, your view of the aquarium will become greener and greener due to the composition of the glass. Acrylic on the other hand remains clear even at great thicknesses. Acrylic allows 92 percent of light to pass while glass only allows 70 percent transmission in the visible spectrum. Things look more natural with acrylic. Some glasses may be unsuitable for use with reef systems due to constituents in the glass itself being poisonous to sensitive invertebrates.
Acrylic is definitely softer than glass and is prone to scratching. This is a major drawback to acrylic, but minor scratches can be buffed out. One of the tests I used prior to deciding on an acrylic show tank was to look at some commercial reef tanks at pet shops and public aquaria that used acrylic to see what kind of abuse was evident. I found that contrary to the horror stories regarding scratches and coralline algae affinity, acrylic tanks in the age range of three to five years showed little evidence of scratching or calcareous algae scouring even when coralline algae was abundant on the rock. I knew that my own show tank would receive even better care than that of a pet store or a public aquarium. The key is to be gentle when cleaning the "glass", clean often while things are easily removed, and take particular care to shield the inner surfaces when initially populating the tank with abrasives (live rock and sand).
If the softness of acrylic is its major drawback, it is also one of its major advantages in that it can be easily machined. Unlike glass, you can cut, drill, and weld acrylic. This allows you to customize your system even after it is in place. For example, my spillway was constructed after the tank was installed and was bonded to the side of the tank exactly where I wanted it- an operation that could not have been performed prior to installation, nor was its final position easily predictable until the show tank was in place.
The show tank was professionally constructed to my specifications using techniques wherein the tank is molecularly bonded and actually becomes seamless. The acrylic is beveled on the edges and Weld*on-40 ("liquid Plexiglas") is pushed into the joint under pressure to weld the precision flat plate acrylic castings in place while held in a precise jig. The joints are thus bonded to form a single one-piece unit with joint strengths far exceeding that of glass glued together with silicone cement. This is NOT a do-it-yourself job- pay a reputable acrylic aquarium manufacturer to build your basic show tank. You can modify it later.
The money saved in getting your show tank right the first time will pay off in ten years when flexing silicone-sealed glass joints begin to leak. But isn't glass going to be less expensive than acrylic? The answer is maybe. If you are building a small reef tank, then glass will be cheaper, but for reef tanks over 100 gallons, acrylic is less expensive. For example, a 250 gallon aquarium can be half the price of its glass counterpart (also don't forget that shipping 130 lbs of acrylic tank from a manufacturer is going to be cheaper than 271 lbs for the same thing in glass).
From the engineering drawing, note that my show tank has an integral upper surface. In fact, it was constructed as a cube (with cutouts on the upper surface for access). The upper surface of the cube adds immense strength to the aquarium and drastically reduces the degree of hydrostatic bowing that would occur in 0.5 inch acrylic material.
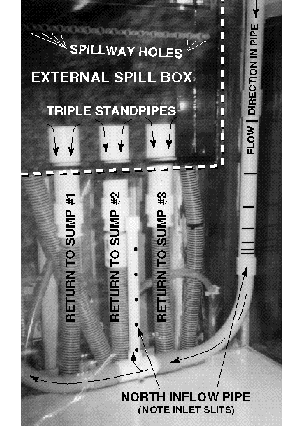
The acrylic tank came with a protective paper laminate over the surfaces. This provided an excellent surface on to which hole patterns could be measured and drawn. It was then a simple matter to drill holes where ever I wanted them. The spill way was my first modification to the basic acrylic cube. I wanted the collection box making up the spillway to be external to the show tank for ease of servicing and to keep from having an ugly black box in the corner of the tank.
Inside the external spill box are three standpipes that pass through the bottom of the box and attach to flexible hose used for cleaning swimming pools. (I researched the material used in this hose which can be obtained at the Home Depot for about $25 per role. It is PVC and compatible with your salt water reef system). These hoses lead down to the sumps in the "aquarium command center" in the basement.
Standpipes are used to give tiny organisms that might make their way into the external spill box a chance to be retrieved before getting swept down the tubes. A line of alternating 0.25 inch and 0.325 inch holes skim water from the show tank's surface and allow it to fall about nine inches into the external spill box. A milled slot about two inches above these holes serves as an emergency overflow into the external spill box should the normal overflow holes become clogged and allow the water level to rise in the show tank.
Note that there are no holes in the show tank below the 26.375 inch level and no siphons. In the event of a power failure, the show tank can not drain down into the sumps. The inflow pipes have Bernoulli vent holes which create bubble-induced water turbulence, but also serve to break a reverse siphon if the main supply pumps quit for any reason.
|
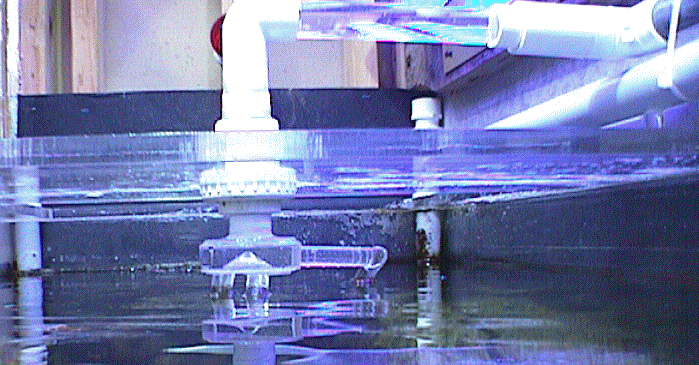
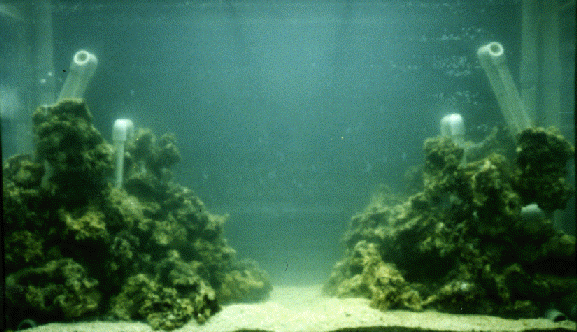
Two one inch diameter "U" shaped pipes, one at either end of the show tank provide flow across the aquarium. The live rock hides the portion of the pipe on the far side from the viewer and the picture frame hides the portion of the pipe on the same side as the viewer. Note that there is a small diameter pipe that resides behind the live rock coral heads to provide flow from the inside of the rock to the outside. Except for these interior reef pipes, all primary flow pipes have a one inch or greater inside diameter.
Consider a car going 60 MPH down the freeway... the air speed is zero right at the surface of the car and rapidly increases in velocity as the distance from the boundary layer increases until the air speed is the 60 MPH that one would expect to flow over the car. What does this have to do with aquaria? Well, the water moving through your pipes has a velocity of zero at the inner pipe wall and increases until beyond the boundary layer where it reaches its maximum velocity for the pipe diameter being used. From a flow resistance standpoint, the larger the diameter of the pipe, the better. But this also has implications for "corrugated" pipes such as the flexible swimming pool hose used in this system. One might expect the resistance due to turbulence to be detrimental in this kind of hose. If the diameter is chosen to be on the order of 1.5 inches however, the turbulence is minimized in the central inch of flow, remaining largely in the boundary layer along the corrugated wall.
The engineering drawing also indicates that there is a rotating center current. This was originally provided by a local pump (directly beneath the show tank) that circulated water from a suction port at one corner of the tank, and applied it to the center of the tank through a rotating coupling machined from Home Depot PVC pipe fittings. Pump pressure caused the inflow head to rotate thereby creating a variable flow on the central faces of the two coral heads which would otherwise block the oscillating flow from one end of the tank to the other. Clear acrylic tubing was used to get the water over to the central distribution point. This did not block light from above and similarly did not create shadows below (see the original central distribution system. (Note that this central circulation system was later replaced with a pair of Carlson Surge Devices.
Once the show tank was set in place and framed in, the external spill box was bonded to the spillway end using Weld*on-40 (note quick bonding cements using thin capillary-action solvents such as methylene chloride are only reliable for tacking things into place. All pressure seams should be welded using a product like IPS Corporation's Weld*on-40 which contains methyl methacrylate monomer and acrylic resin).
Finally the day came to add live rock and some aragonite sand. The sand was only to make the scene look more natural by having a coral rubble bottom rather than a slick acrylic bottom. The sand layer is only about one inch thick and is mostly hidden by the picture frame along the edge. No attempt was made to have a Jaubert system in the show tank itself. They are not attractive, so mine lives in a 40 gallon sump below in the basement aquarium command center.
Before rock could be added however, a pair of half inch diameter PVC pipe scaffoldings had to be constructed to support the freestanding coral heads. Here is the reef as it was being constructed. A base of "cured" Fiji rock was laid down as shown. Each rock was drilled with a quarter-inch masonry bit and attached to the scaffolding with nylon tie-wraps. Due to the time involved in this set up, the entire process was done with water in the tank to minimize die-off
Fiji rock is very "chunky" and I wanted my freestanding reef to have less mass on the upper parts for stability. I used some of the first Australian rock to be received in the Atlanta area to top off the reef. This rock was transshipped "fresh" and cured in the tank with the already established Fiji rock. This Australian rock is a flatter rock with small pock marks. It covered lots of area without much mass or thickness.
To protect the inside of my acrylic tank during all of this rock and sand handling, I cut some thin acrylic sheets which I set up on the inside to act as an abrasion barrier. These were removed once everything was set up.
Return to Michelson Aquarium.